
It’s been so busy in my kitchen in the last two months! I have so much to talk about.
First, for those of you who don’t follow me on Instagram, let me show you a couple photos of my 1983 kitchen with its tiny Jenn-Air wall oven and countertop stove.


On the left, the wall oven and the microwave above (which no longer fills in the opening because they don’t make microwaves that size any more). In the middle, the tiny opening of my oven, which we quickly dubbed the “Easy Bake Oven”due to its diminutive size. We even had to buy new cookie sheets to fit in it when we first moved in! On the right is the countertop stove. Underneath, you can see two cabinets, but they were mostly filled with the giant duct that vented out through the wall to the right (as was the right-most cabinet).
Our kitchen is clearly outdated. We knew that when we bought the house, and we knew we would probably have to gut it at some point. We thought we could live with it for a few years, but after 6 months we realized that the unreliable, tiny oven and the electric cooktop were just not going to work for us. Everything had to be turned in the oven because it heated unevenly. Also, it was so small we couldn’t use most of our cooking pans in it. The other problem was that sometimes it got too hot and other times it didn’t heat up enough. You never knew how to get the correct temperature on it, even with a thermometer inside.
The cooktop? First of all, my husband and I have never had an electric cooktop. Everywhere we’ve lived our adult lives, we’ve had a gas stove. When you turn the temperature up or down on a gas burner, the temperature changes very quickly. On a regular electric burner? Not so much. This resulted in us accidentally burning things a lot in the new kitchen. Unfortunately, we do not have gas lines on our street, so we knew gas was out.
We spent March and April of this year trying to figure out what we could do to update the kitchen. We got estimates for a full renovation and quickly realized we would have to save for many years to afford what we wanted. Then we started thinking about small things we could do now to make the kitchen work for us until we can afford a renovation. We decided the one thing that had to be done was replace the oven and cooktop.
We did a lot of research and decided we would buy an induction range. (We didn’t buy ours at Sears, but this is the model we got). It works by some kind of magnetic magic that I don’t quite understand, but the stove top itself does not heat up. The magnets somehow cause the pot itself to get hot. As a result, it reacts a lot more like a gas stove top than an electric stove top. We budgeted money for a nice range, knowing we would keep it even if we had a kitchen renovation, and for some other small updates. We are really fortunate to have a nice local appliance store (where we bought our last oven, which was also a GE Profile), so we stopped in a few weekends ago and ordered up a stove and range hood. Sounds easy, right?
It turned out to be quite a production. We naively thought that we could just take out the countertop stove and remove the base cabinets to slide a complete range in. Ha ha ha ha (bitter laugh). That turned out to be a sadly unrealistic fantasy on our part. Fortunately, our appliance store has dealt with this type of installation many times. All we knew was that the stovetop was hard wired into the wall. The appliance store kindly arranged for an electrician to come and remove the existing stove top and to install a plug. They also arranged for a carpenter to come and cut out the base cabinet and make sure the opening was the correct size for our new range. Right away, this ate a chunk of money out of our kitchen update budget.
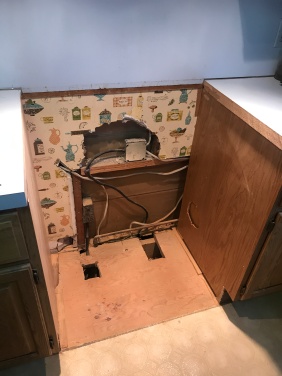
Our electrician arrived and soon informed us that the existing cooktop was only wired for 30 Amps. That meant he needed to reroute the 40 Amp wiring from the wall oven over to the other side of the kitchen. To do this, he had to remove a few panels of our basement ceiling. He also discovered that the people who installed the original cooktop had left a giant hole in the wall behind the cabinet. It took him a few hours, but he installed a new plug and pulled out the old units. This is what it looked like when he left:


If you look really closely you can see the 1950s wallpaper that is secretly behind my cabinets! The following day, the carpenter came to cut out the cabinet to the correct size and remove/patch up the ductwork from the old range. After he left, it looked a lot neater:
The oven arrived on Day 3 of the project. It popped right into the slot with no problems at all. As a bonus, the delivery guys took away all the old oven stuff and a couple of other random appliances we happened to have! That left us wondering what to do with the wall cabinetry for the old oven and microwave. We still had some money in the budget to cover work on that wall, despite the extra oven installation expenses. After tossing around a few ideas, we decided to replace the cabinet with a separate upper and lower cabinet, and extend the countertop to make a bigger baking area. We found this great discount building supply store and bought two hardwood cabinets for a good price. They look similar to our cabinets (but they are clearly not the same). However, for the price, I can put up with them for a few years. This is what we have put in so far:


On the left, you can see the new cabinets we installed, and on the right, the new range and hood. The new oven is amazing. It can bring water to a boil really quickly. The temperatures change much more quickly, like a gas stove. And the oven is amazing! I use the convection bake setting for most of my baking. I don’t have to turn the food any more. And the oven is much better insulated so that the kitchen doesn’t heat up whenever I bake (which is a lot!). Even better, my baking center is now 6 feet long!
Of course, the kitchen still has the ugly baby blue backsplash and counters. We have removed the hideous blue and cream wallpaper though. We have a small amount left in our mini renovation budget to buy an inexpensive countertop for the baking area so it’s one continuous surface. We are also going to buy a cabinet for over the refrigerator where we had to tear out an existing cabinet to fit a modern sized fridge in when we moved in. After that, we will do a little painting to lighten things up and then I think we can live with this kitchen for a while.
I’m going to do another post on what I’ve been baking this month. The new oven works great for baking and it was worth all the trouble to get it installed. I don’t miss the Easy Bake Oven at all!

Congratulations on the mini-renovation!
(By the way, that old wallpaper is fantastic!)
LikeLike
It is kind of cool!
LikeLike